Friday, October 30, 2009

Happy BOO to you!

It is officially halloween. We don't celebrate halloween (gasp, roars from the crowd). My mom is a halloween fanatic. I was on the phone with her today and her halloween gag this year is a fake cockroach!!! Every year she does this kind of thing. So this roach is somehow on a string and you can make it jump toward people. She thinks it is sooooo funny to scare people with it. Oh the stories - just like a little kid!! :) I love it. I think it is this kind of thing that keeps one young.

My share today is a card that I made specifically for her. I cannot wait until she sees it. She will probably ask where the "scare" is though. :)

Credits: Haunted Halloween Mini-Kit by Miss Mint at Peppermint Creative; Simply Halloween Word Art by Tay Silver at Peppermint Creative; Glitter - Doodlebug Designs; Dimensional Glue - Glossy Accents by Ranger; Print and Cut - Silhouette
Thanks for looking! Have a great day!

Thursday, October 29, 2009

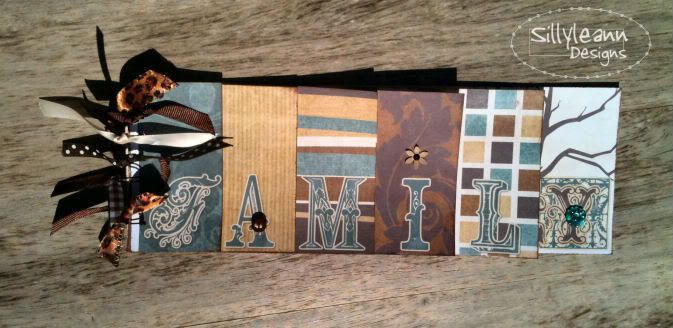
Family Mini Album


I love finding projects for my much loved Bind-it-all! My DH started a new job (well, okay, technically his first job) and I wanted him to have this for his new office.

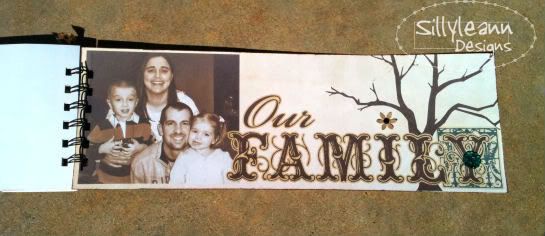
Here is a look at the inside of the last page:


Digital Credits: Pattern Papers, and Word Art - Family Tree Papers and Family Tree Elements by Miss Mint from Peppermint Creative; Metal Binding - Bind It All; Ribbon - Hobby Lobby; Button - My Minds Eye; Brad - My Minds Eye; Flower Punch - EK Success; Black Jewel - Papertrey Ink

Thanks for looking!

Monday, October 26, 2009

Birthday Ensemble for my Niece

I have niece that is turning 6!  Well, she technically already turned 6, but we are celebrating her birthday this Friday.  I put together this little ensemble for her.  One bag is going to have some "green" while the other bag will have a small toy (I haven't thought that one through all the way).  Enjoy today's share!


Digital Credits: Wild Hearts Papers by Miss Mint from Peppermint Creative; Flowers - Prima Flowers; Bag Template by My Timeless Template from Papertrey Ink; Happy Birthday Stamp - SillyLeAnn Designs 2.0

Wednesday, October 21, 2009

Write Plate Decked Out for Fall

I finally got around to taking a better photo of my write plate. The silly pumpkins are still turning out yellow in all the photos, though. I give up. So, yellow pumpkins it is. :)


Credits: Credits: Vector images - Birthday Cupcake BlockART by Tay Silver at Peppermint Creative

I will have to say that I enjoy decorating for fall even more than Christmas, GASP!! I think it has something to do with my DH. I adore Christmas and he vetoed my Christmas tree decorations about 4 years ago. So, now I just do a tree with plain balls and a little something on the mantle. He complained that I had decorated in peppermint candies and ginger breads. He didn't think that was "Christmas". So, I quit. But fall colors make me happy around this time of the year.

Monday, October 05, 2009

Cutting with SCAL and my Cricut

Welcome to Cricut Monday!!

I have tried to share something that I have made with my Cricut each Monday.  It doesn't always happen, but I try.  :)


Today's card is a hybrid of sorts.  I made a tree with flowers and decided to use prima's instead of cutting flowers.  I really like how this turned out.  I hope you enjoy!
Credits:  Tree Cut - my design; Sky Paper - Cosmo Cricket; Tree Paper - my digital paper; Flowers - prima; Jewels - dollar store; Bible Verse Stamp - Everyday Blessings from Papertrey Ink

Sunday, October 04, 2009

Snack Bucket!! We have the snack bucket!
About once a month my daughter will get to bring home the snack bucket. We get to fill it with all kinds of yummy treats. I thought we would do a fun halloweenish treat. We don't really celebrate halloween in our family, but I love giving gifts and passing out treats to all. Also, halloween purples, blacks, oranges, etc. are just beautiful. Who can resist such brilliant colors?
For our treats, we made little mini bags. This were easy-peasy to do. Miss Mint from Peppermint Creative has this adorable bag for sale. You just decorate it with digital papers, print, and cut. For this project, I didn't want to incur a great expense. So, I printed the outside of the bag on regular printer paper. Then, I designed a lining of a solid digital paper and printed it on regular printer paper. However, you must mirror the lining so it will fit on the backside of the outside. I cut them both out. Then glued them front to back making a sturdier paper. Folded and assembled. Lining this mini-bag makes a more cost effective treat as well as adding cuteness.
Credits: Mini Gift Bag Template, Digital Pattern Papers, Digital Purple Swirl, and "I Want Candy Wordart" - Miss Mint from Peppermint Creative; Ribbon - Hobby Lobby

Saturday, October 03, 2009

Digital Cutting and Puchasing Shapes to Cut

I know there is a lot of debate over which is the best cutter out there.  I am certain that there are pro's and con's about every machine.  You really need to find those and figure out which one most meets your need.  I personally purchased a cricut.  I am by no means touting that it is the best machine, but simply the best machine for me. 

Reasons I love my cricut:
  • It is compact, easy to store, easy to get out, and easy to put away.
  • I can find blades, mats, etc. at many local stores (Wal-Mart and Hobby Lobby are both within 2 miles from my house).
  • I can use it with my computer (go to http://www.craftedge.com/ to find out more) to cut any true type font I own.
  • I can design any shape I want to cut and cut it on the computer.
  • I can get wonderful cartridges that have such cute graphics on them.  (watch online - many online stores get very competitive with pricing and you can pick them up for much cheaper than the regular price).
  • I can take it anywhere that I have power and still use it.
  • I am able to cut with my computer, but not bound to it.
  • I can do cart swaps with my friends.  If I want to use a cartridge that I don't have but a friend does, we trade carts for a few days.  You cannot trade, share, or swap digital files though, only the physical cartridges.
Here is my write plate decorated for the fall using vinyl, my cricut, and SCAL.


For my plate I used a design by Tay that can be purchased at http://www.peppermintcreative.com/.  It is easy and fun to get pre-made designs.  It takes a lot of the guess work out of a project.  Tay gives good instructions with her downloadable "Vectors for Vinyl Cutting Machines" (a fancy way to say a pre-made file that you can import into SCAL and cut)  There are tons of shapes, decorations, die cut images, and such to fill your day with cutting.  You can use them for all types of things: cards, scrapbook pages, home decor, paper crafts, just to name a few.
Credits:  Graphics - Tay's Pumpkin Patch Commercial Vectors for Vinyl Cutting Machines available at Peppermint Creative; Vinyl - Expressions Vinyl

Papertrey Ink Stamps - Teacher Gifts

You know how much I love Papertrey Ink (if not read previous post).  Let me tell you about the stamps.  I love the quality of the images when I stamp.  Aside from operator error, I get flawless results.  The stamps come packaged well with a storage case (read previous post for all the details) and are super easy to store.  Also, the stamps come in pieces - for instance, on the apple stamp you can stamp the apple in red, the stem in brown, and the leaf in green.  I thought I would never take the time to stamp all the little details, but it takes a good image to a GREAT image.  Here is an example of me using some fabulous Papertrey Ink stamps.


I made this teachers gift for my son's teachers.  He has 2 classroom teachers!!  Yikes!!!  (yes, two certified teachers, not a teacher and an aid.  So, I have to do 2 of whatever for them)  In the clear box is a set of note cards that are teacher themed.  I thought they would love a set of notecards.  Teachers always need cards for thank you's, notes, etc.  The card standing up is the card I gave them to say thank you. 

First, you cannot go wrong with Papertrey Ink stamps, seriously!  Second, this stamp set called "Teacher's Apple" is a must have if you need to make teacher cards and/or gifts.  It is totally adorable.

Papertrey Ink Review

I have to admit that I am pretty hard to please when it comes to satisfaction. It also takes a lot for someone to win my business. Let me tell you that Papertrey Ink has won my heart. I hesitated to purchase much from them because I felt that their prices were a bit high. A "normal" set of stamps is $24 and a slightly smaller set is $15. I took a chance and purchased the Everyday Blessings set from them a while back (like last year). I was pleased with the set overall. The stamp set came with a CD case in which to store the stamps. I adore this type of storage and was pleased with their particular set up. It also comes with a sticker that you put on the outside of your case. This way you can place the stamps over their images that serves two purposes: easy to find and you can see exactly what your stamp will look like. You can see that I am hard to please as it took me over a year to make my second order. I was so upset. I have been missing out on one of the premier online places to purchase stamps AND other crafting supplies. Let me show you my budget buster of an order.


I won't tell you what I spent, but it was completely worth every penny! Take a close look and you will see 5 stamp sets, 2 heart punches, 3 ink pads, chocolate brown paper, and the paper sampler. I ordered on a Sunday morning just before church. I recieved my goodies on Thursday - free shipping! Considering Sunday was the 13th and I ordered prior to a release, I felt it arrived fast. Bottom line . . . go ahead and order.  Papertrey Ink was a great company and I adored everything I purchased.
 
I will break down some of the purchase today or at a later time. I can't wait to tell you about their Perfect Match cardstock and Perfect Match Hybrid Inks!

Happy World Card Making Day

All throughout the day I will be sharing my latest cards and a few product and store reviews.  I heavily depend on other's opinions about a product before I purchase big items.  I hope that my experience can help you make informed decisions as well.  Also, I love shopping on the web, but I do so very cautiously and wise.  So, I thought I would share my experience with a shop or two that I have used.

Keep checking back.  Fun cards and hopefully helpful reviews will show up all day.

Here is my first share of the day.  This is a set of 3 hybrid cards that I made (hybird means that I used my computer to print paper, elements, or both). 


Credits:  Pattern Paper - Andrea Gold from godigitalscrapping.com; Ribbon - Basic Grey; Thank You Stamps - Michaels $1 bin; Scripture Stamp - Papertrey Ink from the Everyday Blessings set; Big Flower Punch - Whale of a Punch by EK Success; Little Flower - Prima; Button - The Paper Studio

Thursday, October 01, 2009

World Card Making Day

This Saturday is World Card Making Day. I am so excited as I LOVE, LOVE, LOVE to make cards. I will be posting multiple cards on this day as well as a review or two of some online stores to get some FAB products to make fabulous cards. Check back!

Monday, September 28, 2009

Family Tree Card

I fell in love with the Family Tree papers and elements from Miss Mint.  I love, love, LOVE the word art and had to make a card.  So, enjoy today's share.

Tips and Tricks: I printed the bracket with the word art and cut out and adhered onto the card.  It gives it more texture than printing and adding embellishment.
Credits: Pattern Papers, and Word Art - Miss Mint from Peppermint Creative; Ribbon - Ribbons and Bows Oh My; Flower - The Paper Studio; Button - Vintage Buttons from Papertrey Ink

Saturday, September 26, 2009

Speaking of Trees

I have said before how much I adore cute trees. I was so excited when I saw the digital papers and elements from Peppermint Creative called Family Tree. I immediately fell in love with the tree and the rest is history. I made this adorable frame origionally for our living room. But now I am considering giving it away. Enjoy!


Tips and Tricks: I used Grafix Rub-on Transfers to make the rub-on that I used on the glass of the frame. I glued the bows, flowers, and rinestones on top of the glass (I can change them with the seasons if I want).
Credits: Pattern Papers, Tree, and Word Art - Miss Mint from Peppermint Creative; Mini Flower Punch - EK Success; Rinestones and Kraft Paper - Papertrey Ink; Bows - Hobby Lobby; Rub-on Paper - Grafix

Monday, September 14, 2009

Look at this Cutie

I adore this wooden tree.  I picked this up at JoAnn's on clearance for $1.  I painted it, and it sits on my mantle at various seasons and times in the year.  Here is the tree adorned with adorable hearts.


Credits:  Patterned Paper is My Minds Eye, Hearts were cut with my Cricut using the George and Doodlecharms Cart's

Thursday, September 10, 2009

Down but Not Completely Out

I had my wisdom teeth out this week, but I still wanted to share my
newest Cricut Creation using SCAL. I used SCAL and two different fonts
to make a gorgeous Scripture to go under my newest find. I saw this
cross from across the store and immediately knew I had to have it. I
have been wanting a scripture in our living room for a while and was
pleased with the outcome. So pardon my "hopped up on pain meds" post.
I hope you enjoy what will probably be my only share this week.

Sent from my iPhone

Tuesday, September 08, 2009

Die Cut Set

HAPPY CRICUT MONDAY - on Tuesday!
I have tried something new.  I made a set of baby die cuts and little embellishments.  I love playing with graphics and SCAL - and then cutting with the Cricut.  This was a creation using a combination of SCAL and my own graphics program.  The Baby Girl is a font.  I added the shadding as I didn't like the shadow look that is included with SCAL for this particular font.  I designed the flower shape, the pieced rattle, and freehanded the onesie.  The flowers and rattle I embellished with glitter, pens, dootles, etc.  I added a touch of sparkle to the Baby Girl.  The onsie is chalked with a touch of sparkle as well.


Sorry about the photo.  No matter what I tried, I couldn't get the sparkle to look as gorgeous as it does in real life.  I didn't try to hard.  Maybe someday I will re-shoot one.

Saturday, September 05, 2009

Gift Set

Besides birthday cards, I get the bible or scripture cards as my next most requested card.  I love it, but it gets hard to get creative with the stamps that I have.  I did add a few scriptures to my SillyLeAnn Designs 2.0 stamp set.  But for these cards I used the Paper Trey Ink "Everyday Blessings" stamp set.  I really like this set of stamps.  I was hoping they would put out a 2nd scripture set.  But, I haven't see one yet.  Anyway, this gift set has 8 coordinating cards.  I really like the subdued color combination and how it turned out with the brown paper.  The pattern papers are by My Minds Eye.  Thanks for looking!

Other Credits:  Scalloped Oval - Spellbinders; Large Flower - Whale of a Punch; Small Flower - Prima, Ribbon - from stock purchased at Hobby Lobby and Wal-Mart

Friday, September 04, 2009

Painting for my Daughter

I am always looking for something new and exciting to do. I love challenges and new things. After painting my daughters room, I really wanted something kid-ish yet mature to put in her room. I don't do kiddie stuff. :) No cartoon themes. I like sophistication with flair. After looking and shopping for endless hours, I had a thought. I could paint her a picture. So, I went to Hobby Lobby and purchased a large canvas. This is what I came up with.


I was decently pleased with what developed. So, this is hanging over her bed in her room now. The Bible verse was actually printed on "make your own rub-on paper". So, it is technically a rub-on. You really cannot tell without really looking, but the flash picks it right up.

Thursday, September 03, 2009

Oops! I forgot . . .

I made an entire new set of stamps. They arrived a few days ago. I cannot wait to ink them up and share. I'll get some more pics together to update the images from SillyLeAnn Designs Stamps 2.0.
Today's share is another birthday card. I get sooooo many requests for birthday. Enjoy! Do you like the newest SillyLeAnn Designs stamp. I just got my newest designed stamps in and have loved inking them up.

Credits: Paper - My Minds Eye, Ribbon - x-studio, Flower - Prima, Stamp - SillyLeAnn Designs

Tuesday, September 01, 2009

Fun Little Box

As many of you know, I LOVE to give gifts. I love gift sets! I needed something to put some cards into for a card set gift. I racked my brain over and over. This is what I came up with. These boxes are perfect to store cards, envelopes, stamps, etc. Inside each box, I put a set of cards that cordinate with the colors of the box. One box was a mix of cards - birthday, thank you, and so on. The other box was full of notecards that could be used for any occassion. The girls just loved them. I just loved making them and seeing happy faces. :) To make the boxes, I found a paper meche type of box that I painted dots on them. I glued ribbon around them to look like a wrapped present. I made the huge bows that went on top and glued them on. I then cut tags from the Fiskars paper cutting tool (it is the orange templates that you use the sliding cutter). I stamped and inked the tags. Violla! Cute gift box!

FYI - I made these a while back. I ran across the picture and thought it would be great to share. ;)