Saturday, October 26, 2013

Project Life 2012, Status Complete

Warning:  Lots of photos ahead

We had a pretty big year last year.  I had a hard time keeping up with my Project Life book.  I am so proud to finally tie up all the loose ends.

Here is a look at the overview of my book.


I have it all put together in Blurb.  A quick upload and my beautiful keepsake is on its way!

Here is a closer look at the cover.

It is really similar to my 2010 and 2011 covers.  I got the original template from Weeds and Wildflowers.  It was a free download that I do not think exists any more on their website.

For my book, I used the Weeds and Wildflowers {Every}Day Life Pages.  They were already put together for me.  All I had to do was add the pictures and add journaling.  I did make some tweaks as I don't do a traditional Project Life.  But, I enjoyed it and wouldn't have finished it without having so much of the "work" out of the way.

Here are a few of my interior pages.


It is amazing times in our family.  I have enjoyed spending time with my children, spending romantic evenings in front of the fire with my husband, and getting my house completely organized and set up. God has been faithful to us in 2012.  He has been faithful to us in 2013 as well.  We are so blessed.

I hope you enjoy a peek into my little Digital world of Project Life.

Sunday, August 25, 2013

Farewell Stamp-a-Faire 2013

Whew!  What a weekend!!  I had a great day yesterday working on my cards.  I was able to finish up the last two today.  Yeah!!  (Top Chef . . . Top Chef . . . Top Chef)  I would love to win Top Chef for being among those who completed all the challenges.

Well, that is it.  Stamp-a-Faire is over.  I go back to real life.  Maybe life will bring me back to my blog more frequently.  Who knows?  Thanks for stopping by.

Here is a look back at all of my projects.  I am going to leave these on top of my desk for a few days.  It brings me such joy!


This has been so fun.  Thanks again for all the comments and kind words.  It means the world to me.

Sweet Sugar Coated Embelishments

Yes!!!!  My final challenge . . . completed!!!!  I used Danielle Flanders technique.  So cute!!


Everything you see if from Papertrey Ink.

Now, I am channeling my inner "Top Chef".  I have never won anything from Papertrey Ink after all these years.  My whole family is praying that I win.  :)  Hey, I am not above a little supernatural advantage.

Thanks for following along and peeking into my creative life.

Gallon Quart Pint Challenge

I am back to share my Gallon Quart Pint Challenge card.  These sorts of challenges really are a challenge to me.  But, I tackled it head on and am excited about the results.  I wanted to go outside my normal.  I really love Pinefeather.  It is such a beautiful color.  It was nice to use it outside of "holiday" type projects.

For my card, I chose Pinefeather as my gallon color.  Simply Chartreuse is my quart color.  And my pop of color or pint is Raspberry Fizz.


Products used:  Card Stock, dies, stamps, and ink: Papertrey Ink; Embossing Folder: Quickutz; Jewels: Jewelry isle of Hobby Lobby

Thanks for looking!  I have one more project left!  Yes!!!!

Saturday, August 24, 2013

Limited Ingredients Challenge


Ok, ok.  I said I was done.  I was cleaning up and about to walk out of my craft room when this little number hit my brain.  So, I stayed and made it.


I really did use limited ingredients.  I have learned to let go.  In the past, I would try to cram several things into my card . . . another color, another element.  I would wind up with cards I just wasn't very happy with.  So, I let go and see what comes.

Thanks for stopping by all day today!

Whipping up Scent-sational Cards

I am back to continue playing along with Papertrey Ink's Stamp-a-Faire.  Dinner was great.  The company was excellent.  The kids are in bed.  :)

Here is a card that I am going to give to my son.  We enjoy having hot cocoa together.  He is such a great kid.  He will love this!


Well fellow crafters, I am most likely done for the day.  I will be back tomorrow to finish up the last 3 challenges: Gallon, Quart, Pint Color Challenge; Limited Supplies Challenge, and the Sweet Sugar Coated Embellishments challenge.

Happy Stamp-a-Faire!

Custom Accents from the Oven

This was so fun!!!  I have never, ever in my life done a shrink plastic craft.  It was a total hoot!!

I admit that I was a bit worried when I peeked into my oven and saw this.

All the pieces were warped and turning into balls of ruin.  Then . . . all of the sudden.  They began to flatten into these cute little pieces of fun.

I loved making this super colorful and fun card.

I die cut a the largest star in the Seeing Stars Die Collection in matte.  I bought the inker type of alcohol ink so I couldn't stamp.  I don't own any other inks outside of PTI and a few tool inks like Watermark.   I used two of the biggest flourishes from Fancy Flourishes in clear.  I did a take off of Dawn McVey's idea to just keep them clear and add some glitter.

I am about to take a break and go have dinner with my wonderful husband.  I'll be back later to finish up the rest.  Six challenges down and four to go!!!!

Sprinkle of Salt

This is by far my favorite challenge today.  I don't know what it is exactly.  Then as I was making my card . . . I gasped.  The results are truly stunning.  I wish my camera owuld capture just how beautiful this really is.  I am almost shocked this is my creation.  (Well, ummm, my creation almost completely copied from Nichole.)

Here is my card with the salt only.


Here is the salt and color.  Beautiful!!!


And here is how it turned out:


My favorite card today by far.  Thanks Nichole.  So fun!!

Mixing Mists to Match


Errr.  I thought I had a Hawaiian Shores refill.  I had something all planned out.  I had a hard time changing my direction.


It was weird when I started putting the ink into the alcohol.  My clear bottle turned orange.  And it still is orange.  Isn't that strange?

Thanks for looking.  All products are Papertrey Ink.

Rolled Dough Designs

Whew!!  One word . . . miserable!!


Yes, that is my miserable mess.  This is what dried overnight.  Not a happy camper.

But, it isn't my first hiccup and probably won't be my last.  So, I moved forward.

Barely.

And finally squeezed these out.  Literally.  All over my desk . . . again.


But, I was super happy at how cute they are.  So, I moved forward some more.


I am going to gracefully put this challenge behind me.  I will revisit it another day.  But seriously, ain't nobody got time for that.  :)

All supplies are Papertrey Ink.  The clay is Paper Clay.

Tea Staining Techniques


I am working on the Papertrey Ink Stamp-a-Faire projects.  Last night in the wee hours, I put a small strip of white muslin in a pan of boiling water and tea.  I got up and put it in the dryer this morning - very skeptical.  I pulled it out and was amazed.  I think if I do this again, I will apply some of Melissa's techniques for getting various shades and colors.  I just pretty much pushed mine down in the tea and it came out pretty much the same color.  But in the end I was so pleased with the results.


I used the Frilly Flowers dies for the flower.  The background was embossed with the Guide Lines impression plate with the Angled Labels as a mask.  It is stamped with Guide Lines II and Mat Stack 1 collection stamps.  I finished the flower off with a Berry Sorbet button for just a pop of color.  

Fun technique.  Thanks Melissa!

Breakfast Bake and Take

I am blogging all day (and probably tomorrow and early Monday) about Papertrey Ink's Stamp-a-Faire 2013.  It is a fun day of crafting, learning, and hanging out in my craft room.

Here is my contribution to the color and sketch challenge earlier this morning:

Ahhhhh, it feels good to be back in my craft room making some goodness.  I was so tired and so uninspired this morning.  But, I finally have myself in gear.  This card took WAY too long, but I love the results.

Thanks for following along with my Stamp-a-Faire 2013 journey.  I should also point out that we are having internet dropouts.  Oh the joys of living in the country!!

Friday, August 23, 2013

Stamp-a-Faire 2013 - I am ready!

I was putting a video together to show you my preparations.  I have been working all day to get my craft room cleaned up, cook, clean, and all the other essentials that a mom of 3 has in a day.  I am tired. It is late.  When I loaded my video clips into iMovie, I couldn't resist.


We moved into our home less than 3 months ago.  So, needless to say . . . my craft room is very much neglected.  :(  I haven't really been able to do anything in it.  Ok, very little.  I am looking forward to "breaking it in" tomorrow morning and all day.

Thanks for watching!  I will be back all day tomorrow sharing projects and such.

Here is a little peek where I will be all day:

DSC_2731.JPG

Friday, March 01, 2013

The Planning Part 3 - The Structures

I am in the middle of describing my craft room planning.

Can anyone say "Excessive Compulsive"?  :)

I want this space to be perfect.  Ideal.  I want it to be me.  I don't want to constantly be tweaking and updating.  I want to do things that make sense.  So basically, I will drive myself crazy because I am not sure the perfect room could ever be designed.  Things are constantly changing.  But stupidly, I set out to do just that . . . design a perfect, for me, craft room.  

Fundamentally, I had an overall need for this space.  I needed a workspace (or desk), a computer station, and I really, really wanted a sewing station (but it wasn't a necessity).  I would also need some sort of bulk storage or large cabinet.  So, I started there.  

It became apparent as I was looking at the various furnishings that nothing seemed to fit the bill.  I really needed a more custom design.   I didn't have a lot of space, so I had to be smarter.  The second thing I discovered was that I know nothing about cabinet making.  I would draw things out and wonder if it made sense.  How deep are cabinets customarily, what are normal drawer sizes, and what makes sense in the cabinet world.  I was praying one day and when I got up, I felt like I should head to Home Depot.  I walked around all the beautiful cabinet displays.  I picked up a few brochures and asked a couple of questions.  I walked out feeling extremely discouraged.  It felt like a total loss.  


Later that night, I was looking through the various things I had picked up from my local Home Depot.  I became intrigued by this little book.  


It had all these various cabinets with sizes.  I could begin to see what possibilities my little room held.  So, I went to work on my list again.  


I started taking measurements.  What could fit where?  Can something fit in a drawer?  Do I want it to fit into a drawer?  Where in the flow of my room would this item work best?


You can see in this photo that I began to break things up.  Certain things I wanted in my craft area.  Other things seemed to fit better in my computer area.  And then I had my sewing area I was still hopeful to find a place for.  


So with the included layout plan sheet in hand, I began forming what would soon become my craft room.  


I began putting my needs and wants into cabinet form.  Here you can see two distinct work spaces . . . a craft space and a computer space.  The right side is planned to be my craft station.  There is closed storage up above with an open shelf that runs along the top.  Open storage towers would run around the edge of both stations.  The station on the left would serve as my computer station.  It would have a larger opening to allow my computer to fit.  Both stations would have drawers under the counter top and drawer banks surrounding the work space.  

I still had a little bump out area directly behind the door and computer station.  Originally, I wanted that to be a huge deep storage shelf.  As the house was being framed, I realized what a need little area that really is.  Perfect for my sewing area.


So, here is the idea for my sewing area.  It is just wide enough to house my sewing machine and serger full time.  YEAH!!  It would have closed uppers and a drawer bank down one side of the work space.  

Using the Home Depot cabinet book as my guide, I was able to judge the space so much better.  I could see what size an actual cabinet is, how it related to my space, and what is a "normal" look.


I realized that despite the good prefab cabinets they sell, there were still quite a few holes.  They didn't have any of the upper open shelves.  That would all have to be custom done by me (ok, who am I kidding . . . it would be my amazing husband).  I was still piecing cabinetry together from 3 vendors and doing quite a bit of work ourselves.  


Sigh . . . regroup . . . rethink . . . and pray.


The next thing that became obvious to me is that I was not utilizing one entire wall to the far right of the drawings.  And . . . most importantly . . . I didn't have anywhere to put my large storage cabinet. 


In the mean time, I had to meet the cabinet maker at our house to go over the kitchen, baths, etc.  In passing, I showed him my room.  I just shot from the hip and said.  I wanted some sort of small storage cabinet here.  A long work station here.  Some uppers.  And continued around the room.  


A couple of weeks later and look what showed up in my cabinet plan.


There it was.  My room!!  It is with the Master Suite Cabinets because my little place in the world is off the back of the master suite.  It was love at first sight!!  Well, almost.


You can see I made a few tweaks and changes.  Actually, I made a lot.  I think there were like 6 total back and forth plans between us.  This is really close to the final version.  


My little place in the world just became a reality.  


Oh, waiting is so hard to do when you are so totally happy and completely in love with the space!!!


Friday, February 22, 2013

The Planning Part 2 - The Craft Room

This is a continuation of the planning of my new craft room.  If something doesn't make sense, go back to the previous post or ask.

Now that I knew where my room would be, I went fast to work to on the floor plans.  After lots of thinking, looking, planning, soul-searching . . . again . . . I finally had the floor plans complete of "my little craft place in the world".

(insert pic of floor plans)

Basically, I have a 12.5 x 7 room with a "4 foot wide by 18 inches deep" nook.

I just thought the hard part was behind me.  Ha ha ha ha ha ha . . . ha!  The joke was on me.  NOW, the work begins!  Oh the pressure!!  :)  What to do?  I was given a budget by my husband (and a very generous one in my opinion) of $2500.

I revisited all my Pinterest pins again.  I began to notice how many people use Ikea furniture and JetMax cubes.  The research of dimensions and price began.  Thank you, Jesus, for the internet.  I don't know how in the world people did this kind of thing before having such amazing tools at their disposal.    In my research, I came across many other things as well.  I wanted to show you everything I explored before landing at my final destination.  My hope is that all my time (and admitted neuroses) would benefit someone out there.

I found some AMAZING and beautiful Martha Stewart furniture.


This stuff is seriously beautiful.  But, it was such a hefty price tag.  This drawer unit piece alone was $399.  It also had a huge footprint.  I would only be able to get 2 of the drawer units in my craft room with a small desk space.  Nothing else, and I mean nothing else would fit in there now.  I was bummed.    I cried wishing I had seen this furniture before I set out making floor plans.

The main Ikea pieces I looked at were the Billy Bookcases and the Alex drawers.


Source: ikea.com via LeAnn on Pinterest


The bookshelf cannot be beat at $60.  And the drawers would be a bit more expensive at $120 each, but I thought they would make great space.

Then, it hit me.

I can do anything I want.  I can do anything I want.  As in, change how I previously stored things.  I can re-imagine my current storage.  I could update, correct, and finally design a space that fits me rather than fitting me into a space.

Oh boy!

This could get interesting!!

Tuesday, January 08, 2013

The Planning Part 1 - My Craft Room

Because we were building our new home custom, the sky was literally the limit in the planning portion of the floor plans.  The limit became the reality of what I really want vs need.

In our last house, I had a small craft room.   Ok, some would even call it a closet.  It was on purpose in our Master Bath.  It was large enough for a work desk and tons of crafting supplies.  But, we knew that such a space might never aid in the sell of this house down the road.  But a huge closet would.  :)  And it would be a THIRD closet in the Master Suite.  (And it did help sell the house . . . for sale by owner . . . in 60 days . . . God is good)

At first I thought it would be so awkward to have my craft room in the Master Bath.  Just typing it sounds hilarious!!  But, as it turns out, it was genius!  Our master set on the end of our house.  So my craft room was far away from the rest of the house.  My getaway . . . my retreat . . . it allowed this stay at home mom some much needed get away time (think husband works 60 to 80 hours a week most weeks).  And when you don't really have a lot of money to get away with, you can understand what a blessing this space was to me.  Free . . . always available . . . and with immediate access.

Here is what that space looked like and how I used it.


I had this huge bank of amazing shelves.  I tried my best to keep things nice, neat, and tidy.  I grew to be in love with the ability to grab everything with a slight reach.

So here I sat . . . builder and husband asking me what I wanted to do.  Armed with lots of prayer, dreaming on Pinterest, and my past experience - I had two obvious things to decide.  How big?  And where in the house did I want this space?

How big?  After much soul searching, praying, thinking and deliberating, I realized that I did need (and could and would use) a bigger space than a closet.  But making it the size of a bedroom seemed inappropriate as well.  Although it would be amazing, I knew in my heart that it needed to be something in between.

Where?  This was at times really hard for me.  I love my family.  I have literally given me over to them - above my own career ambitions, above my own sanity some days.  And to be truthful . .  . I love it!!!  I love serving my family.  Nothing (well crafting does run pretty close to the top) gives me more satisfaction.  So on one hand, I wanted my space to be an extension of my world with in the main flow of the house.  But on the other hand, I love having a retreat and my own little haven.  For me, crafting is so therapeutic.  It keeps my sanity . . . keeps me balanced.  Life is so hard and stressful at times.  In the end, having a place to retreat and reload was more important to this mom.  So, I decided it would be off of the master suite somewhere.

As it turns out, it was placed at the back of my closet.  So in order to find me in my crafting world, you have to come into my house.  Walk across the living room.  Go through my bedroom.  Walk through the bathroom.  And when you get to my closet, take a deep breath, open the door and head to the little hidden door at the back.  Pause . . . open . . . and you are in my oasis.  My fun room!!  My craft room.

Saturday, January 05, 2013

The Dream - My Craft Room

It has been WAY too long since I was very active on my blog and even in my creating world.  WAY too long!!  That is about to change.  And by about to change, I mean in 5 to 6 months.  :)

We are 75% through the actual construction phase of our home.  It has been crazy, fun, heart-breaking, humbling, amazing, awesome, tedious, treacherous, and tons of fun.  By far the largest point of stress and time has gone into my craft room.  From the dreaming phase, to the planning phase, and then to the building phase - my craft room has remained a high priority and at the forefront of a lot of planning, thoughts, decision, and budget.  Can anyone say HUSBAND OF THE YEAR!!!??

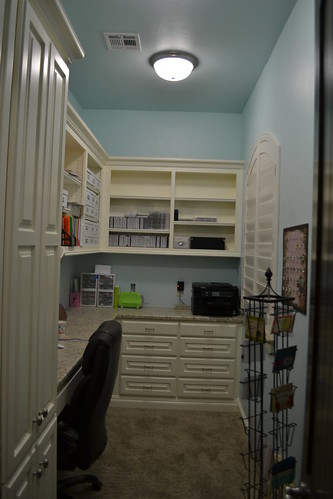
The cabinets are officially in!!


But before I jump right to it, I thought I would take a couple of posts to show you what went in to this room.  I hope that the long and tedious hours I spent might somehow or someway help even one person in their journey to craft room heaven.

It all began with a dream . . . my very own craft room.  It would be this amazing 250 sqft space of high ceilings, bright lights, and more storage than you could shake a stick at.


I mean . . . who wouldn't want a room like this.  It has custom cabinets, a large island, amazing work space, lots of light - both natural and artificial.

Or how about this one . . .

This room takes my breath away.  So beautiful.  So clean.  So pristine.  In the end, it became my capstone of inspiration.  I kept coming back to this picture somehow.  In a dreamers world, the sky is the limit.  So why not dream BIG!

Then . . .

. . . reality hit . . .

What could or would I actually appropriate to such a space?  How much square footage did I really want to ear mark in my home for my craft area?  How much was I willing to spend?  How much could I spend?  What is wisdom on how much this room should eat into my planning time, budget, and mental capacity?  How important is a craft room, really?

So, I stopped thinking.  I went to the Pin Boards and started my dreaming journey back up.  I only pinned things that inspired me.  Things I could see myself doing.  Things I enjoyed.  Even if it was clever or beautiful, if it didn't fit me . . . it didn't get a pin.  I didn't worry about budget, space, or reality.  What was it that I truly loved in a craft space?


I loved the separate work spaces here.  I really like the idea of having my computer work station right in my craft room.


Or how about these amazing drawer units.  Such great space!

I will not put all my pins in this post.  (I can hear the thank you and hallelujahs now.)  If you want to see my Craft Room Inspiration Board, please have a look.  You can see it here: http://pinterest.com/leannjolliff/craft-room-ideas/

After pinning for several months, it became clearer to me what I tended to gravitate towards.  I learned that I love to keep things compartmentalized.  I like having everything orderly, in its place, and behind some sort of storage (rather it is a bin, box, drawer, cabinet - but not showing).   I learned that I couldn't do an overly cluttered space where my buttons, embellishments, ribbons, etc. hung out for all to see.    I learned that just about every craft room on Pinterest is done in white.  And that was ok because I LOVED the white.   I learned that I didn't mind wall to wall furniture . . . as long as I couldn't "see" the stuff.  -- Do you see a major trend here? --  I learned that I was blessed to even have a "problem" such as what kind of craft space do I really want.

So . . . I could begin to see it . . . my craft space . . . an orderly space . . . a white space . . . a space where I could relax . . . a space that inspires . . . a space that allows me a retreat . . . a space for a passion . . . a space to read my bible . . . a space to call my own . . . a space that made me feel good . . .