Saturday, February 25, 2012

PTI Blog Hop - February 2012

I am so excited to be participating in the blog hop for the first time in a LONG time.  My release products just came in yesterday, but I already had this in my head.  So, I hope you enjoy.

Here is the front:

Then you open it up:

I created a little pop up for a gift card.  I made it and cut it out on my Silhouette.

Here is a close up of the inside of the card:

This was a fun challenge.  It really made me stretch myself.  This was a super fun card to make.  Thanks for looking.

Supplies - All Papertrey Ink unless noted
Stamps: Beautiful Butterflies, Turning a New Leaf, Inside and Out: Birthday, Butterflies (Martha Stewart)
Inks: Simply Chartreuse, Raspberry Fizz, Orange Zest, Kraft, Yellow (Studio G), VersaMark
Dies: Mat Stack 4, Turning a New Leaf, Beautiful Butterflies
Ribbon: Orange Zest Satin Dot
Punch: Butterfly (Martha Stewart)
Paper: Kraft, White (Sam's Club), Simply Chartreuse

Monday, February 20, 2012

From the Bottom of My Heart

I have a quick Monday share for you.  This was made from more of my "scraps" that I am working to use up.  Quick, easy, and ready to send.


Supplies - Pattern Paper and Butterfly Die Cuts- TE Key Ingredients; Stamps - Taylored Expressions

Thanks for looking.  Happy President's Day to all my US readers.  I am having a fun filled day with my kids today.

Thursday, February 16, 2012

Thanks for Everything

I am still in my mode of using up older supplies.  I have had these Prima Flowers forever now.  In fact, I could probably wall paper a couple of complete houses with the flowers that I have left from my Prima infatuation.  :)  I will use them.  I will use them.  I will use them.  Actually, forcing myself to use through some of my supplies has been pretty therapeutic and eye opening.  It makes me consider each and every purchase.  Will this such-n-such still be around in a few months?  Or can I see myself honestly using up this before it goes out of my style?  And I have learned that my supplies were meant to be used and not hoarded up for months or even years.  (I know no one knows what I am talking about, right?)

Thanks for stopping by today.  I have a few more cards that I will be sharing from my use it or loose it phase.


Supplies - Paper: The Paper Studio; Flowers: Prima; Ribbon: Hobby Lobby; Stamp: Papertrey Ink; Embossing Powder: Fillagree

Tuesday, February 14, 2012

Happy Valentine's Day

As tradition would hold, I sent my children off to school today with special handmade valentine's.  This year my son put his design preferences on them and my daughter ultimately followed.  Although, I wish she would have stuck with her original idea of glitter swirls and hearts.  BUT, I love making things for the kids and love seeing them sparkle when they see the finished product.

Here is what we came up with:


My son really liked the idea of the "You Rock" with the guitar and was super excited that I had a "Dude, You Rock" stamp.  So, we went with the "Dude You Rock" and Red Guitars for the boys and the "You Rock" with Pink guitars for the girls.  50 valentine's later and I was done.

I hope the kids love them, but I am pretty certain that they will end up at the bottom of the trash can this side of next week.  :)  Either way, I had fun designing them with the kids and spending some much needed crafty time.

Supplies - All Papertrey Ink unless noted
Paper - White Sam's Club 80lb card stock
Stamps - My Hero My Dad, Heart Prints, Boy Basics: Rock On, Signature Greetings
Ink - Smokey Shadow, Raspberry Fizz, Pure Poppy, True Black
Dies - Rock On

Friday, February 10, 2012

Challenging Myself to Look at my Stash

As you may or may not know, we are in the process of building a house.  I have been working on designing my craft room.  (Yes, I have the most amazing husband in the world.  As he insisted that we design in the plans a room of my very own far away from the reaches of my children.  My own little escape and piece of heaven. )  I have been thinking about all the aspects that will go into my room.  I realized a few needs that I currently don't have.  One of the needs being a place for patterned paper.  I don't tend to use it much, but I do love it.  It wouldn't sit there if I have some way of storing it in such a way that made it assessable and easily available.

I am also challenging myself to use up some things in my stash that are stuck or haven't been used.  This will allow the move to go easier.  And it will use up some things I just don't use much anymore.  That is how this card was born - using up older supplies that have been "stuck" and using some patterned paper.


I went ahead and made a coordinating envelope to go with the card.  I didn't have enough of the patterned paper, so I had to turn to my stamp stash and make something.  I love how it turned out.  It is fun to add these details.  I will hopefully continue to challenge myself to go a step further than just a card front.

Saturday, February 04, 2012

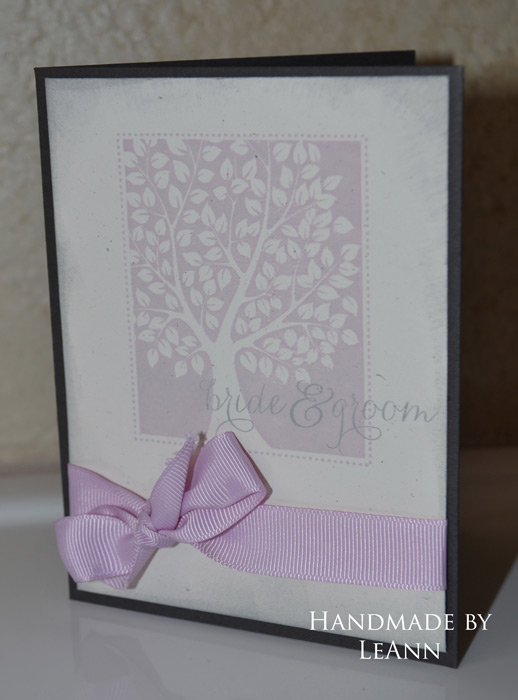
To the Bride and Groom

A really good friend of ours just announced her engagement a couple of weeks ago.  I was so excited for her.  I have been needing to get a few more wedding cards made, so this was the perfect inspiration.


I have had a HUGE hole in my stamping arsenal for a while when it comes to good wedding stamps.  I was super excited for PTI to put out such a great Love and Marriage Stamp set.  It is the perfect combination of images and sentiments for such precious occasions.

I have been working on making a "complete card package" every time a make a card.  I usually fly through the card not even considering the inside or envelope.  So, I took some time to finish this card out completely.

It isn't anything special inside, but I thought it was a great touch to finish the overall card.  I am going to continue to push myself in the finishing details area.  No promises though.  :)  But, I am going to be making an effort.

Have a great weekend!  We are spending the weekend together as a family.  It is mom/son and dad/daughter date night.  We have plans to catch a movie the next night.  And we are planning our Family Fun Game Night for Sunday.  It is so much fun to play Old Maid, Uno, Crazy 8, Trouble, etc with the kids.  I am trying to get in some extra family time before the new baby takes up my time for a while.

Supplies - All Papertrey Ink

Wednesday, February 01, 2012

Project Life 2011

Once again, I was able to complete my Project Life for last year or 2011.  Although I don't do a full on Project 365, I get pretty close (well, for the most part).  My goal is to just take pictures of our life and family.

After a year's worth of hard work . . . my book arrived today!!!


I ordered again from Blurb.  I was in love with my 2010 Project Life book.  So, it was a no brainer where I would get mine from this year.  I am super pleased with the quality and the turn around time.

Here is a little peek inside.


If you are interested, here is some random information about what I do and how it gets from photo to awesome book in 365 days.

I take LOTS of photos.  I always have.  I don't stress about taking a photo a day, but I really try to, on purpose, capture as many things behind the lens as possible.

I have used Weeds and Wildflowers stuff for my last 2 books.  Let me just say that it is FABULOUS!!!  Gina, who I think owns Weeds, is the best!  The girls at the Weedpatch (the Weeds and Wildflowers forum) are amazing.  They are so helpful, so nice, and so willing to help and share.  This year I used the Every{day} Life line of products.  I really love how big the photos turn out.  Last year I used the Sweet and Simple Line of products and although I was super pleased, the Every{day} Life blew it out of the water.  The focus is really on the photos, then the journaling, and then the decoration.  The best part is that you can get as decorated or sophisticated as you choose.  If you are like me and like the CAS style, it is super easy.  If you prefer more embellishment, it is pretty easy to add decorative papers, elements, word art, and title.  What I love the most is when you open my book, you will SEE the photos.  They take center stage.

I format my book as follows: a monthly title page, a 2 page spread for the 1st to the 7th, a 2 page spread for the 8th to the 14th, a 2 page spread for the 15th to the 21st, a 2 page spread for the 22nd to the 28th, a single page for the 29th to the 31st (or 30th).  I do add a couple of title pages at the front and an ending page at the very end.  But that is just my preference.  If I only have 2 photos for a particular week, I roll with it.  If I have 10 photos I want to include for a particular week, I go with that too.  I don't stress about it at all.  I do like to add as much journaling as possible.  I have learned through the years of scrapbooking that the journaling completes the story.

There are times when I do make a single book about a single thing.  For instance, when we take a big vacation, I include some of those photos in my yearly book.  But, I then go back and make a book about that particular vacation with extra details and lots and lots of photos.  I also make smaller books for my children that cover a year in their life.  Again, some of the same photos end up in both books.  In my kids' books, I do a lot more detail and journaling about them specifically.  So, there is a page in their book about their school information: teacher, grade, friends, favorite subjects, etc.  I also include a 2 page spread about football season: coach, team photo, highlights, memories, and lots of action shots.

I work very hard at doing it as the year progresses.  The secret to my success is to do it.  :)  Easy, right?  I work hard to catch back up if I begin to lag behind.  This has been a HUGE help.  I assemble my Project Life book in the Blurb software all along the way.  It keeps me from having to format 120 pages all at once.  I can do it little by little as I go.  Also, my kids' books start and end in August of each year.  It is opposite of my P365.  It allows me some time to finish up and tweak anything without the burden of 4 books due all at once.  I do the vacation books along the way as well.

Thanks for looking.  If you have any questions, I would love to help you be successful at your very own book.  My family and I have greatly enjoyed the books that I have made.  You can do it if you really want to.  I spend about 1 to 2 hours per month on my Project Life book.  That is totally doable, and I would love to help you have a book of memories of your own.

Tuesday, January 31, 2012

Mining My Stamp Stash

I have switched my stamp index over to Evernote officially.  It is complete, and I LOVE it!!  I have found so many great uses for stamp sets that have been setting dormant.  I love that I can "mine" my own stamp stash for images and sentiments.  Don't get me wrong.  I love getting new stamps.  But, at some point you have to take a good look at your stash and either use it or lose it.


This card was made with some stamp sets that have yet to see ink.  Most of that is circumstantial at this point, but it is nice to use some of my new things as I get back into the swing of card making again.  This card all started with the flower stamp from Boxes, Bags, and Tags.  I love that flower.  Where has it been?  Well, it was locked away in forgetful land until Evernote brings these things to light.

Thanks for looking today!  I hope you have a great week!

Supplies - all Papertrey Ink unless noted:
Stamps: Boxes Bags and Tags, Daydreamer, Label Basics, Fillable Frames #4
Ink: Aqua Mist, Hawaiian Shores, Simply Chartreuse, Smokey Shadow
Other: Aqua Mist Ribbon, Label Basics Dies, Rhinestone (dollar store), Stampers Select White Card Stock

Tuesday, January 10, 2012

Baby Girl

So, I liked making the shaped card so much that I made a girl one.


I loved how the little scallops turned out.  I have a stamp from years ago made by "The Paper Studio".  It is a long simple scallop stamp.  I was so easy to bend it to go around the legs of the onesie.

I didn't get a photo of the inside.  Oh!!  I stamped the "Congrats on your new little bundle" from Signature Greetings.  I accented it with a flower from the Flower Fusion line.  Shame on me.  I thought that was one of the best parts.

Credits - All Papertrey Ink unless noted:  Stamps - Damask Designs and Unknown Set by The Paper Studio; Flowers - Prima; Pearls - craft store; Ink - Berry Sorbet; Die - Shape Up Onesie Die

Thursday, January 05, 2012

Baby on the Brain

I definitely have baby on the brain.  I was putting away my newest Papertrey Ink order when I ran across this Onesie Die.  I couldn't stop thinking about it.  So, I made a card. Again, I kept it simple.  I am still trying to get back into the creative swing.


Yes, I made a boy card.  Because, I am after all having a boy.  I am super excited.  Anyway.  I was so happy with how this turned out.  It wasn't as easy as I thought it was going to be cutting the card.  Two layers of card stock gave my little Cuttlebug a run for its money.

Credits - All Papertrey Ink unless noted: Paper - Spring Rain; Ink - Spring Rain, Enchanted Evening, and Fresh Snow; Stamps - Everyday Classics and A Little Argyle

Sunday, January 01, 2012

Happy New Year

I just wanted to wish everyone a Happy New Year!  I went into my craft room and made my very first card in months.  It felt so good.  But, it was funny as I sometimes felt like I had 2 left hands (which would be GREAT if I were left handed).  I couldn't remember where I kept things.  It came back slowly at first, but I started acting like I had never taken time off before long.

I went simple.  Easy.  Mostly I wanted to try my new PTI inks.  More on that later.  I want to use them several times before I give an honest opinion.

Thanks for stopping by today.


Credits all Papertrey Ink unless noted otherwise:  Designer Paper - Hobby Lobby; Vintage Cream Card Stock; Ink - Hawaiian Shores and Raspberry Fizz; Dies - Butterfly and Mat Stack 4 Layerz; Stamps - Butterfly Dreams and Limited Edition Thank You Stamp; Ribbon - Hawaiian Shores


Wednesday, December 28, 2011

Where in the World

I seem to have gone missing in blog land.  I cannot tell you that things will pick up anytime soon, but I do promise to blog more than 1 time per 6 months.  :)  Where to begin and how to keep it short and sweet.

My dad got sick and wasn't getting any better.  Long story short, he had a stroke during a simple eye surgery.  I spent a lot of time at my parents house over the summer and just after school started.  Praise the Lord.  My dad is recovering.  Slowly, but recovering non the less.

I have not shared tons about my private life.  Again long story short, my husband and I have been trying to have #3 for about 3 1/2 years.  We had 2 back to back summers of heart break when I miscarried.  Again, to God be the glory, I am pregnant.  The baby and I are doing well.  Well, mom is experiencing some serious pregnancy sickness, but it is nothing earth shattering or that won't go away after the birth of our 3rd.  I am due mid-May with a little boy.  We are working on a name, but so far he is nameless.

Oh, and we bought 10 acres at the beginning of 2011.  We are starting construction on our house in February of 2012.  We are putting the final touches on the floor plans the next 2 weeks.

So, not only have I not been blogging.  I haven't been doing ANY crafting.  Blasphemy!!!  :)  In fact, I haven't bought anything since June until I put in an order during PTI's December release.

I have been keeping up with my Project 365.  So, I thought I would share my November title page from my 2011 book.  Yes, it is all complete except the 21st to the 28th and the 29th to the 31st.

I am sorry for the unexpected absence.  But let's hope the new year will bring me some much needed crafting therapy.  I miss making cards more than words can express.  It is like a salve to my soul.

Saturday, July 30, 2011

Memories

It has been a LONG time since I have paper scrapbooked.  Most of my friends and followers know that I switched to total digital over 10 years ago.  But, I still have some photos that are a blast from the past that I would like to scrap.  My style and technique has changed so much since I last paper scrapped, but it will still look good in my album.  So, enjoy!  Who knows when I will get the scrapbooking inspiration again.  :)


Basically, everything you see is from Papertrey Ink.  This photo was taken in 1986.  (Yes, that is exposing!) I really wanted to journal on the front, but I couldn't find the right pen so I just journaled on the back.  If I find the need to buy a pen to journal on Kraft, I will definitely bring it to the front.  I also need to add a date so that I don't have to slip it out of the book to see the date.  I don't have a great solution for it, so I am going to wait.

Thanks for looking.  It was actually really fun to try at something other than a card.

Saturday, July 23, 2011

Stamp-a-faire Challenge #5

This will probably be my last share for the day.  I am playing along with the PTI Stamp-a-faire today.  The deadline is looming, and I don't think I can make another card before it is over.  I have had a very fun and relaxing day.  I hope you have enjoyed all of my cards today as much as I have enjoyed creating them.  This has been a fun filled, PTI, crafty day.  :) Thanks for looking and leaving your comments.

This challenge was to use a stamp to create a faux border.  I used the Heart Prints stamps to create my scallop border.


Supplies:  All Papertrey Ink unless noted
Stamps: Garden Variety, Botanical Silhouettes, Heart Prints
Ink: New Leaf, Dark Chocolate, Raspberry Fizz
Paper: Rustic White, Raspberry Fizz
Ribbon: Hibiscus Burst Ribbon

Enjoy the rest of your weekend!!  I hope to craft and post soon.

Stamp-a-faire Challenge #7

Yes!  I finished another one!!  YEAH!!  The twitter updates are amazing.  It looks like everyone at the Stamp-a-faire event are having an amazing time.  Here's to hoping I win a prize.  :)

This challenge was to see if you could find 2 or 3 stamp sets that worked together surprisingly.  I used the star image from "Silent Night" and some medallions from Giga Guidelines and Guidelines II to make the back ground.  I am sure this has been done, but I discovered that the Tiny Tags series fit inside the Mat Stack stamps.  So fun!!


Thanks for looking.  I had fun with this one and making the color combo.  Again, all supplies are from Papertrey Ink.

Stamp-a-faire Challenge #8

So, I am working out of order today.  :)  But, I am still having so much fun!

This challenge was to make a card where the cover is slightly shorter than the back.  I don't recall ever making a card like this before, so it was fun to try.


I have been wanting to pull out some pattern paper for a while.  It seems like when I first started stamping and card making that I couldn't do anything without a patterned paper.  Now, I have gone full circle and hardly use them at all.  Interesting what we trend towards over time.

Supplies:  All Papertrey Ink

Stamp-a-faire Challenge #3

I am finally starting to work some of my crafting muscles back into shape.  Yeah!!  :)

This challenge was all about cutting a window in your card and wrapping ribbon through it.  I went out on a limb and used the bow to kind of accent the butterfly.  This was an extremely fun card to create.  Thanks for looking.


I have one more angle for you to see it possibly better.


Oh, this was fun!!  I love it when projects just come together.  It is fun to find stamps from lots of sets and create a card.  So much fun!!

Supplies: All Papertrey Ink (except the sun outline which is from Verve and the yellow ink which is from the Michael's dollar bin - it was my effort to match Harvest Gold)

Stamp-a-Faire Challenge #2

Yeah, I made it through the 2nd challenge.  :)  I am having a fun slow, but very fun day.  This challenge was to use Raspberry Fizz and Smokey Shadow.


I had fun with this one.  And, I used the glimmer mist again.  I am addicted to the shimmer.  Eek!  The sentiment is coming up fuzzy while it is not in real life.  I would fuss with it, but I am shooting with a new camera and don't want to spend today figuring out the best shooting combo.  Thanks for looking!

Supplies:  All supplies are from Papertrey Ink (except the Glimmer Mist).

Stamp • a • Faire Begins at Home

I have had a crazy, wild, fun, hard, heart-breaking, and blessed summer.  Sounds crazy, hugh?  But so true.  To spare you (and frankly me, too), I will leave out the details except to tell you that my husband has graciously given me this little day in the year to just stamp.  Stamping is such a source of fresh wind in my life.  And trust me . . . I could use it today.  :)

I am going to try and play along with the Papertrey Ink's Stamp-a-Faire challenges and fun all day.  I have NEVER taken a whole day just to play.  This should be interesting and fun.  We'll see what really gets done today.  So, I am sorry upfront for the post blast that should/will happen today.

The first challenge was to stamp a strip using one of our favorite icons in our stamping stash.  I have must have back-to-school on my mind as this is what I came up with.


I like how I went for an obvious, but not-so-obvious, color scheme.  I think it works.  Do you see the shimmer on the Pinefeather card stock?  It is so pretty in real life.  I am still unsure of the main image thingy. I will have to keep looking at it to see if I want to make a change.  But, otherwise, I was super happy.

This was the first card I have actually made since May.  Seriously.  Yes, really!!  My 4th of July post has been scheduled since like November of last year.  :)  Sneaky, hugh?  And my book was ordered at the end of May.  So, let's just say that today is timely and so exciting for me.

Supplies: It is all from Papertrey Ink except the dark green ink (which is Momento) and the spray shimmer (which is from Tattered Angels).

Monday, July 04, 2011

Happy 4th and Best Wishes

I just wanted to pop in and wish everyone Happy Independence Day (well, if you are in the US that is).  I hope you are having a great summer!


-All Papertrey Ink unless noted-
Stamps: Distressed Stripes, Tiny Treats: Halloween, Round and Round, Stars (The Paper Studio)
Paper: Vintage Cream, Rustic White, Kraft
Ink: Enchanted Evening, Scarlet Jewel, Tea Dye Duo, Vintage Cream
Ribbon: Scarlet Jewel Grosgrain, Fine Linen Satin
Other: Silver Star (Michael's), Mat Stack 4 Die